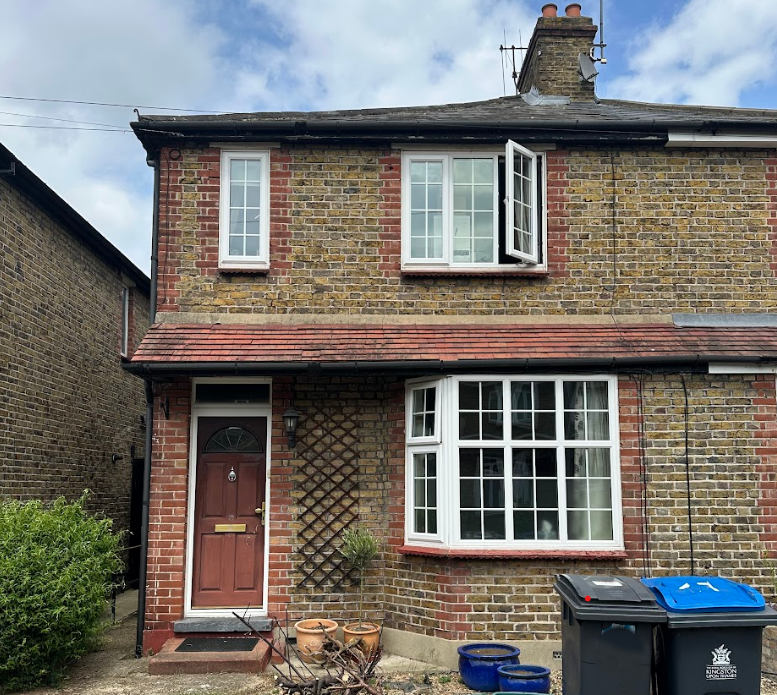
Shari, an architect acting for their company and their client in Kingston upon Thames, approached us for a measured building survey and existing drawings of a residential property just off Buckingham Road.
The initial brief was straightforward:
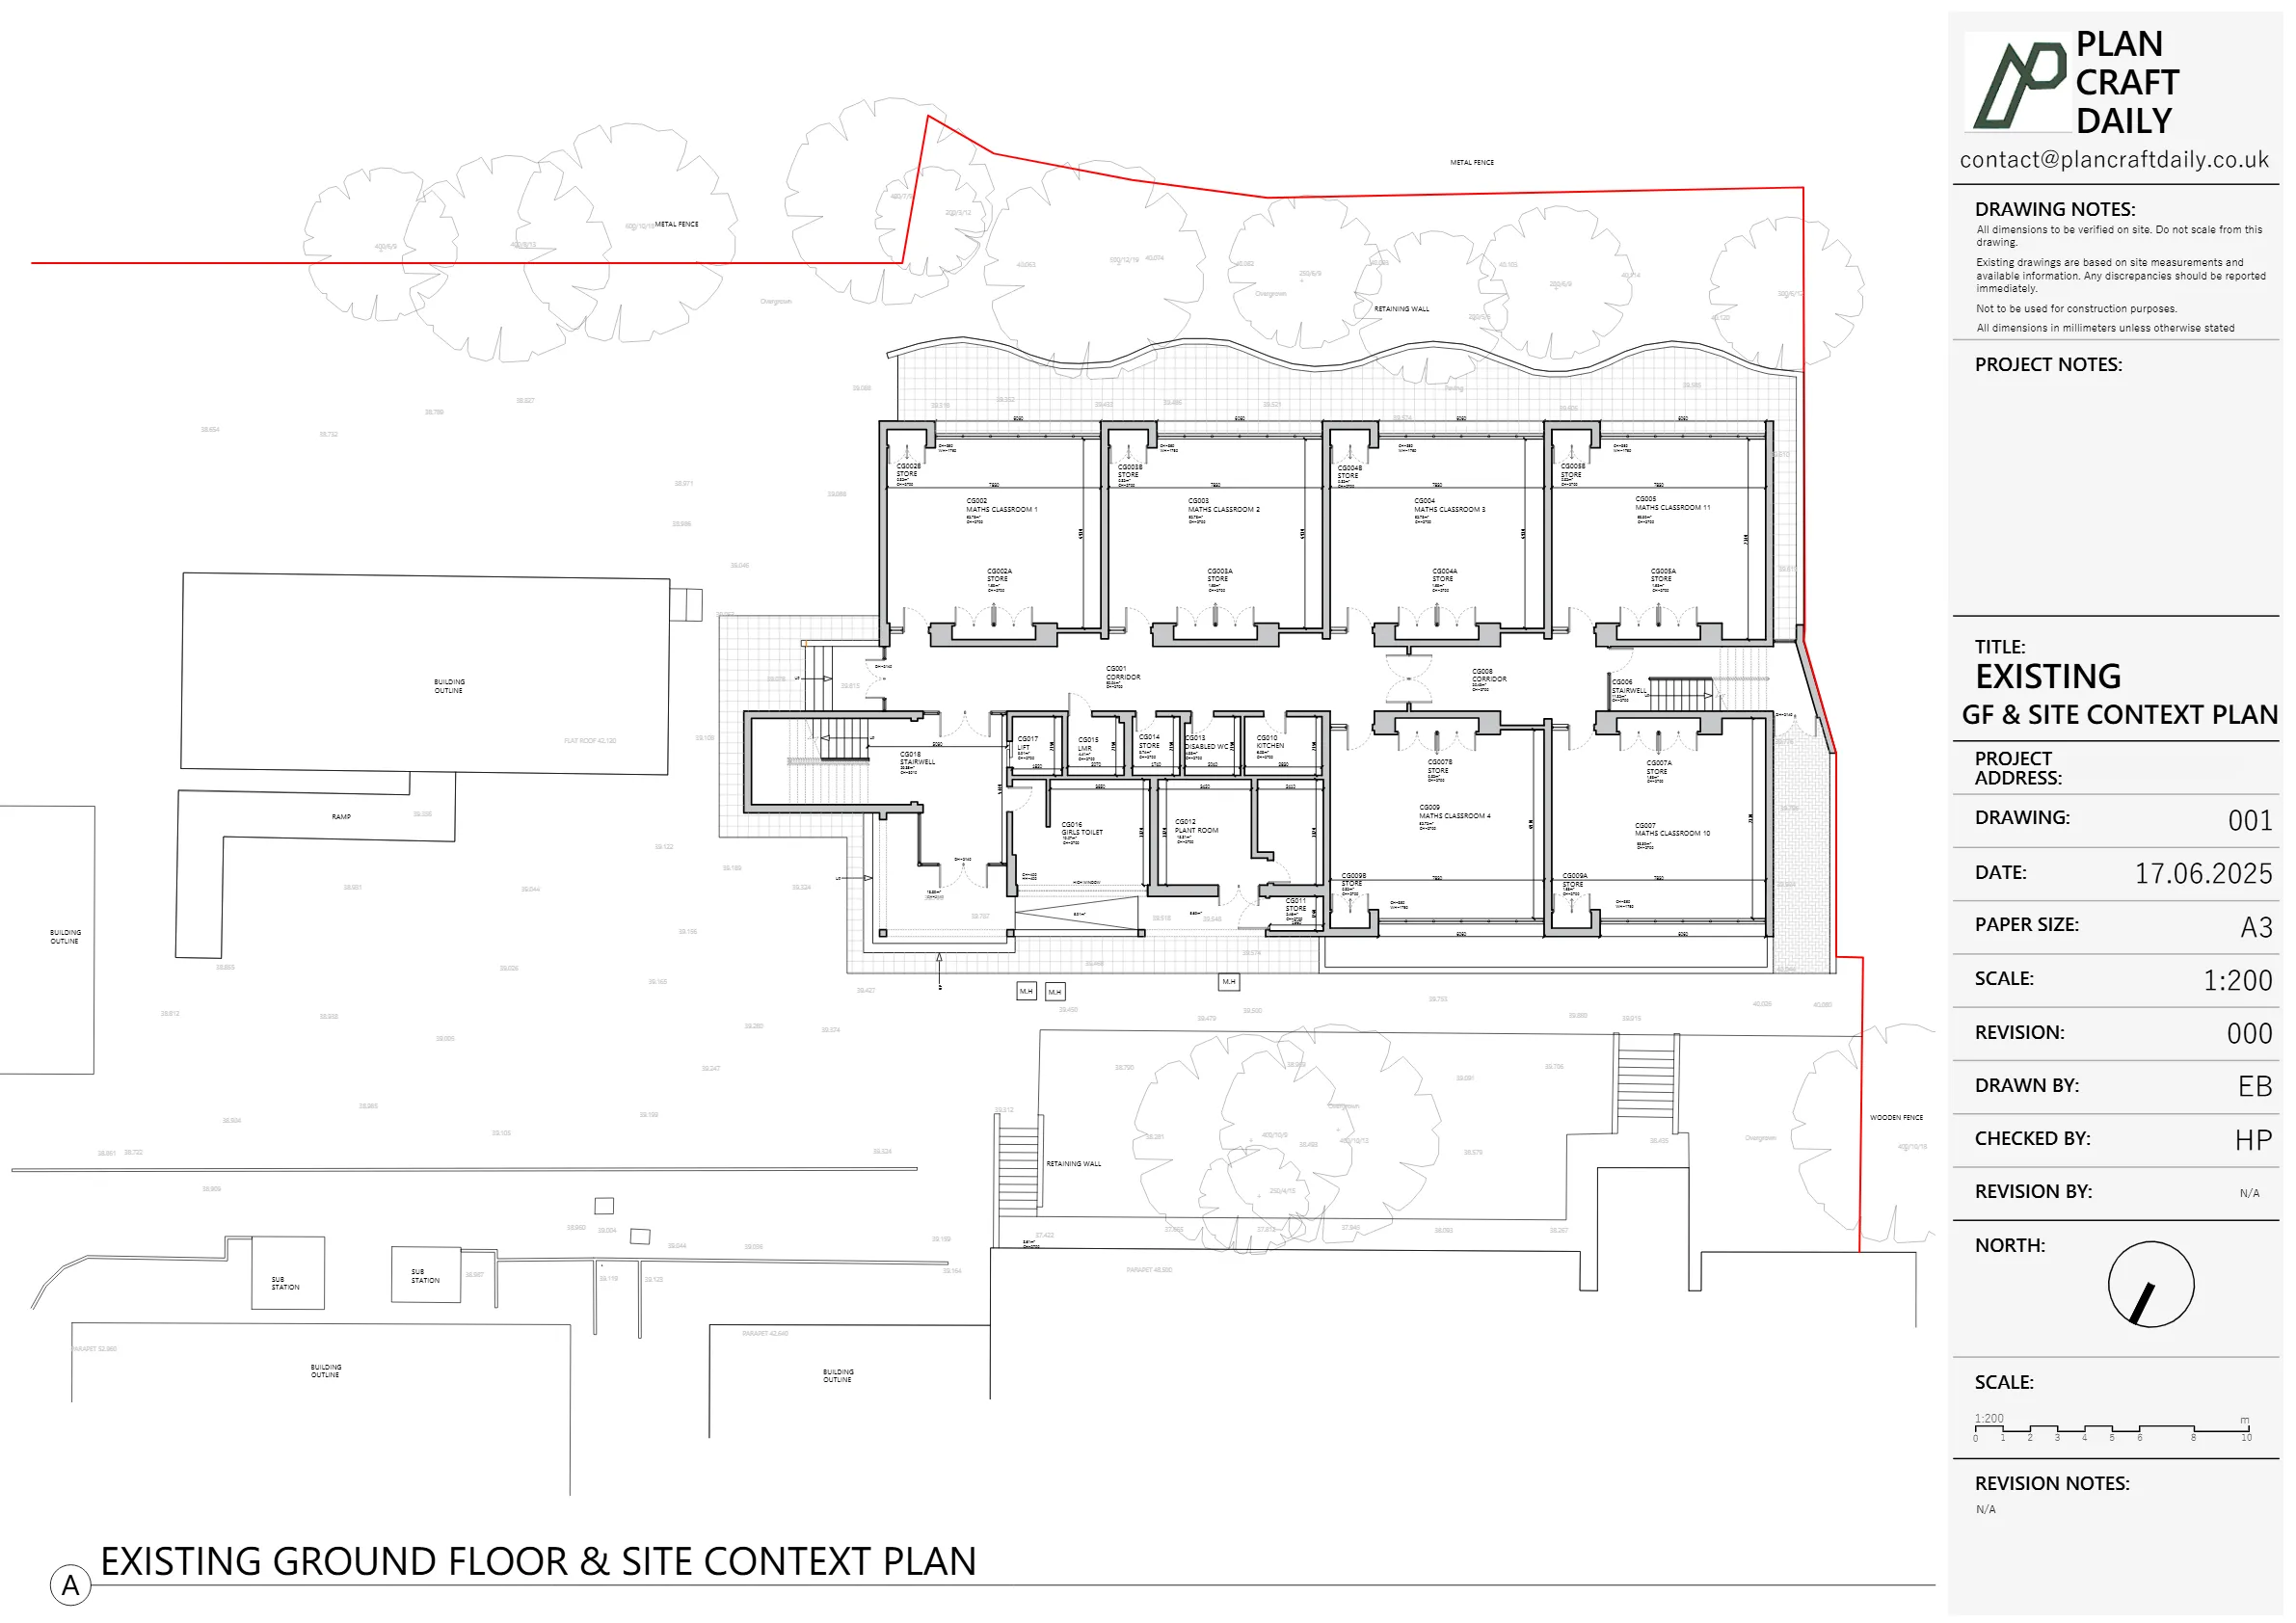
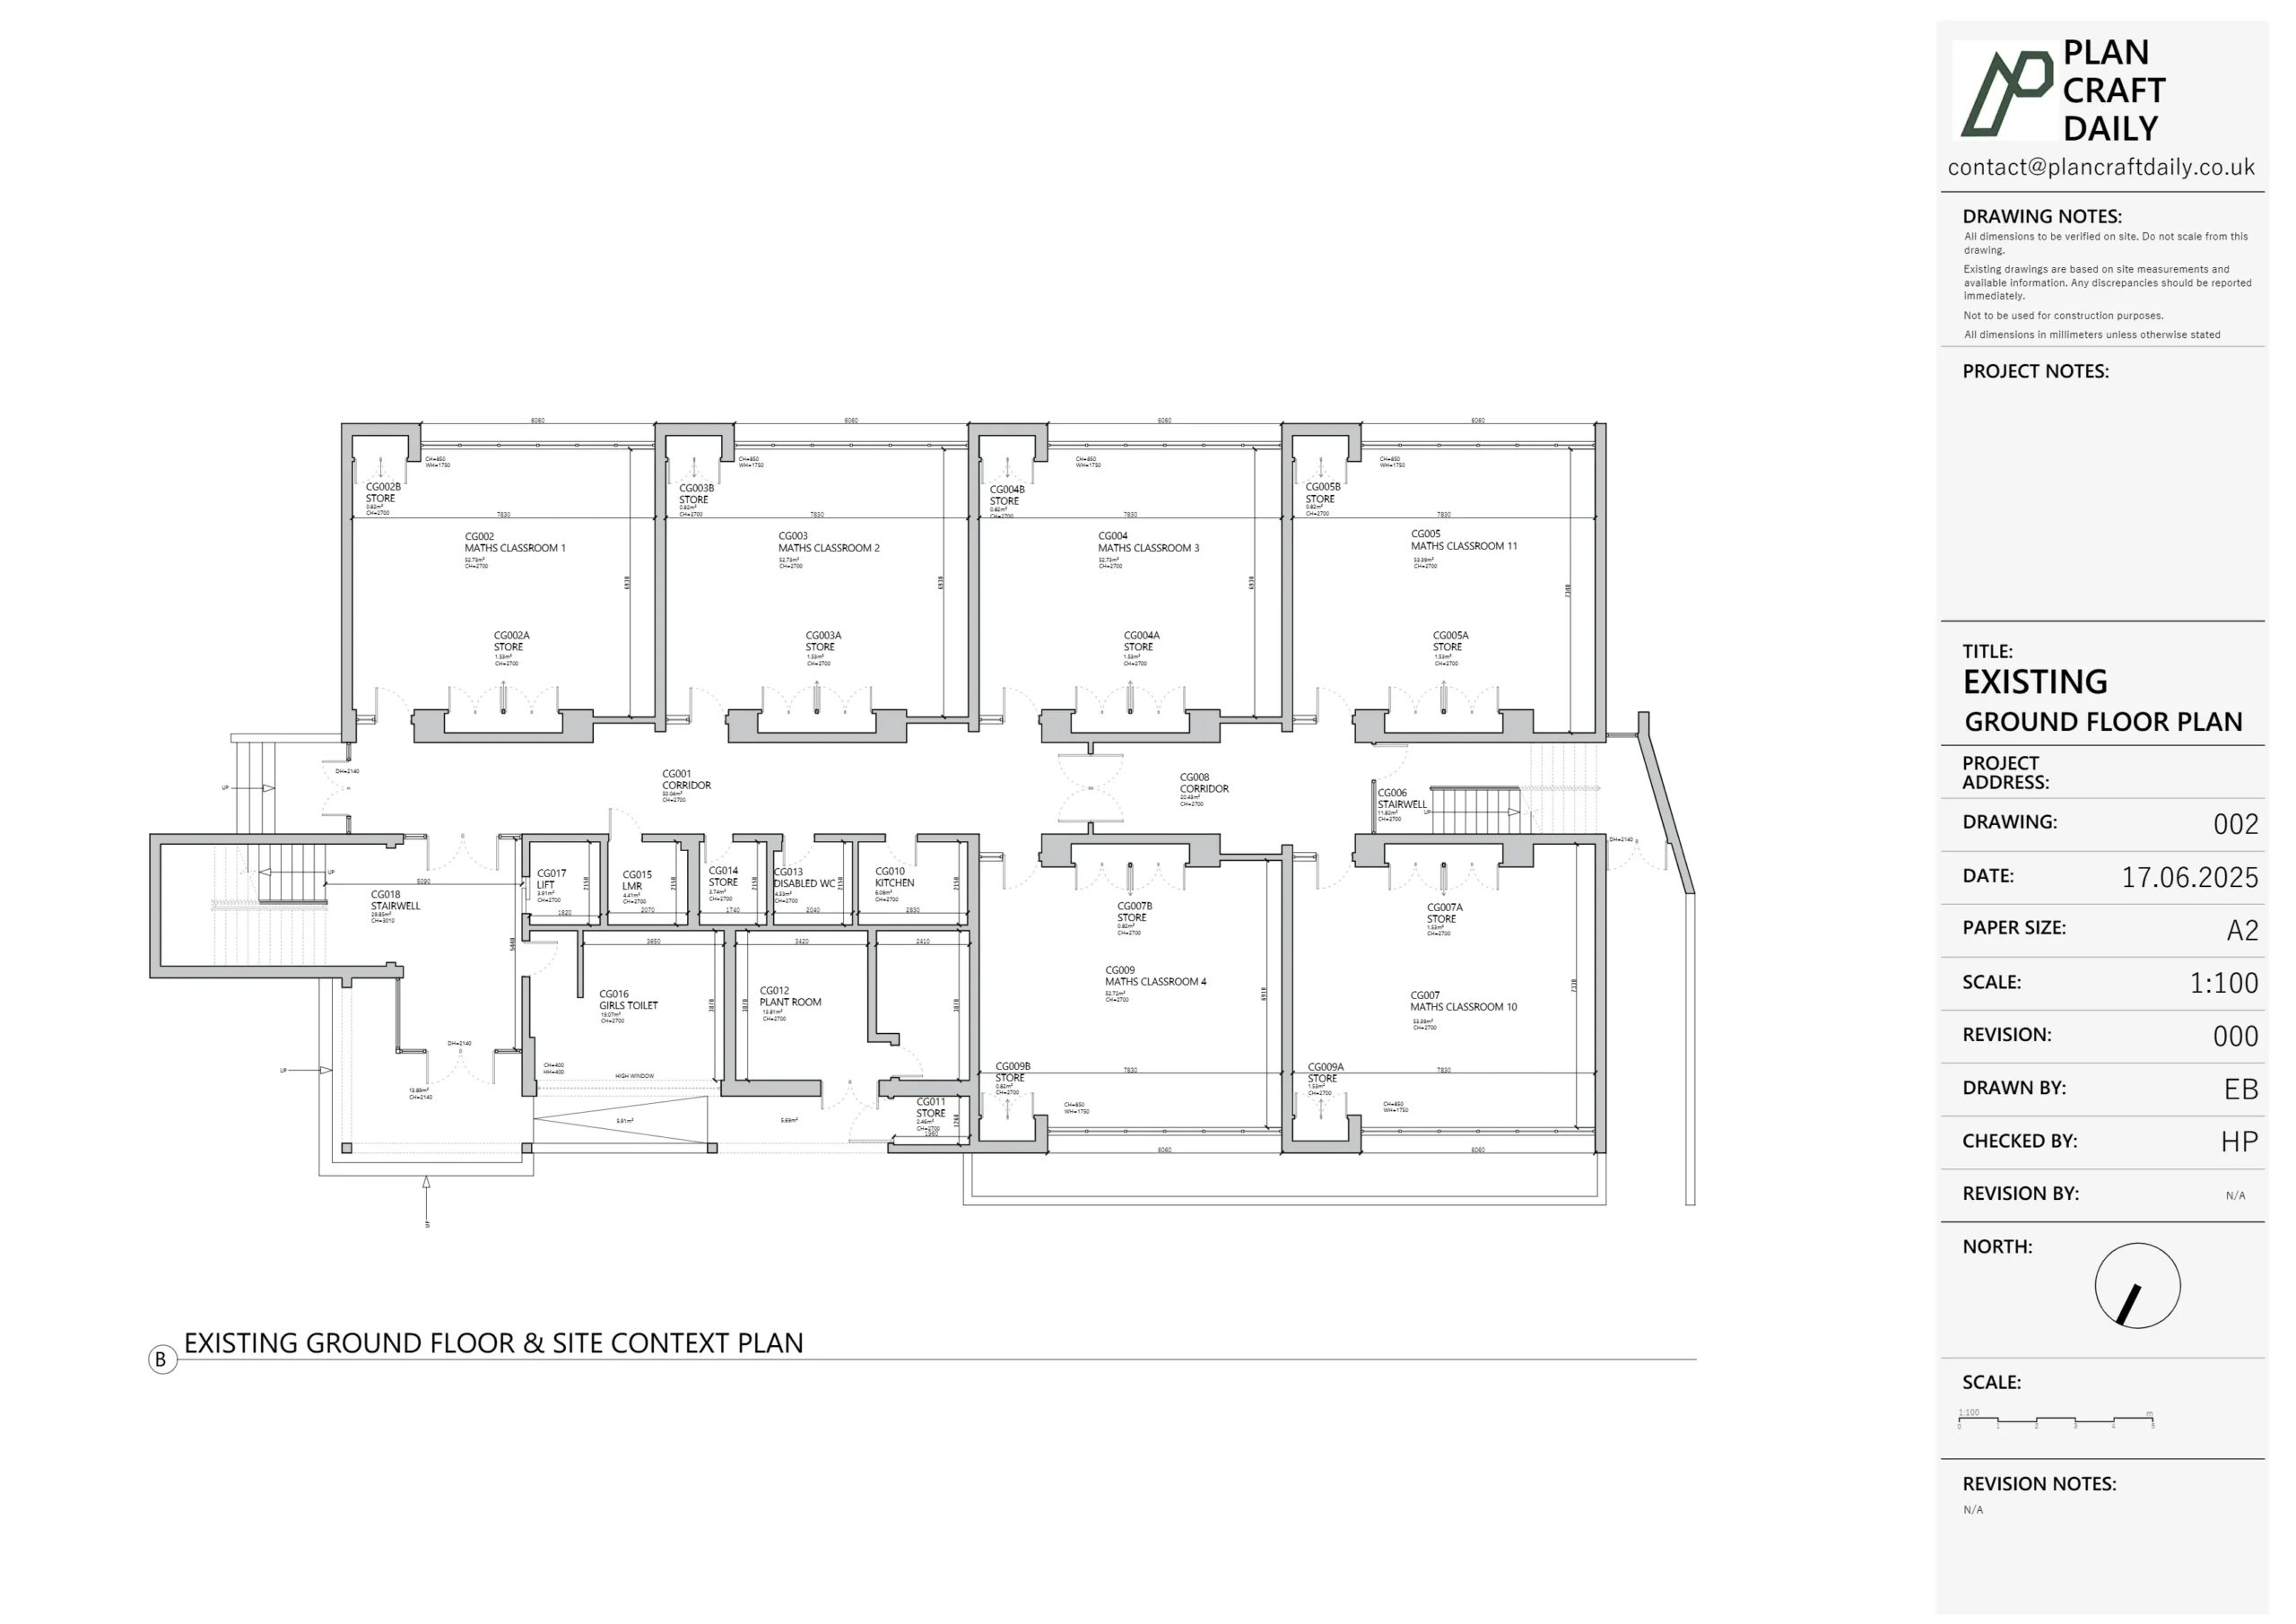
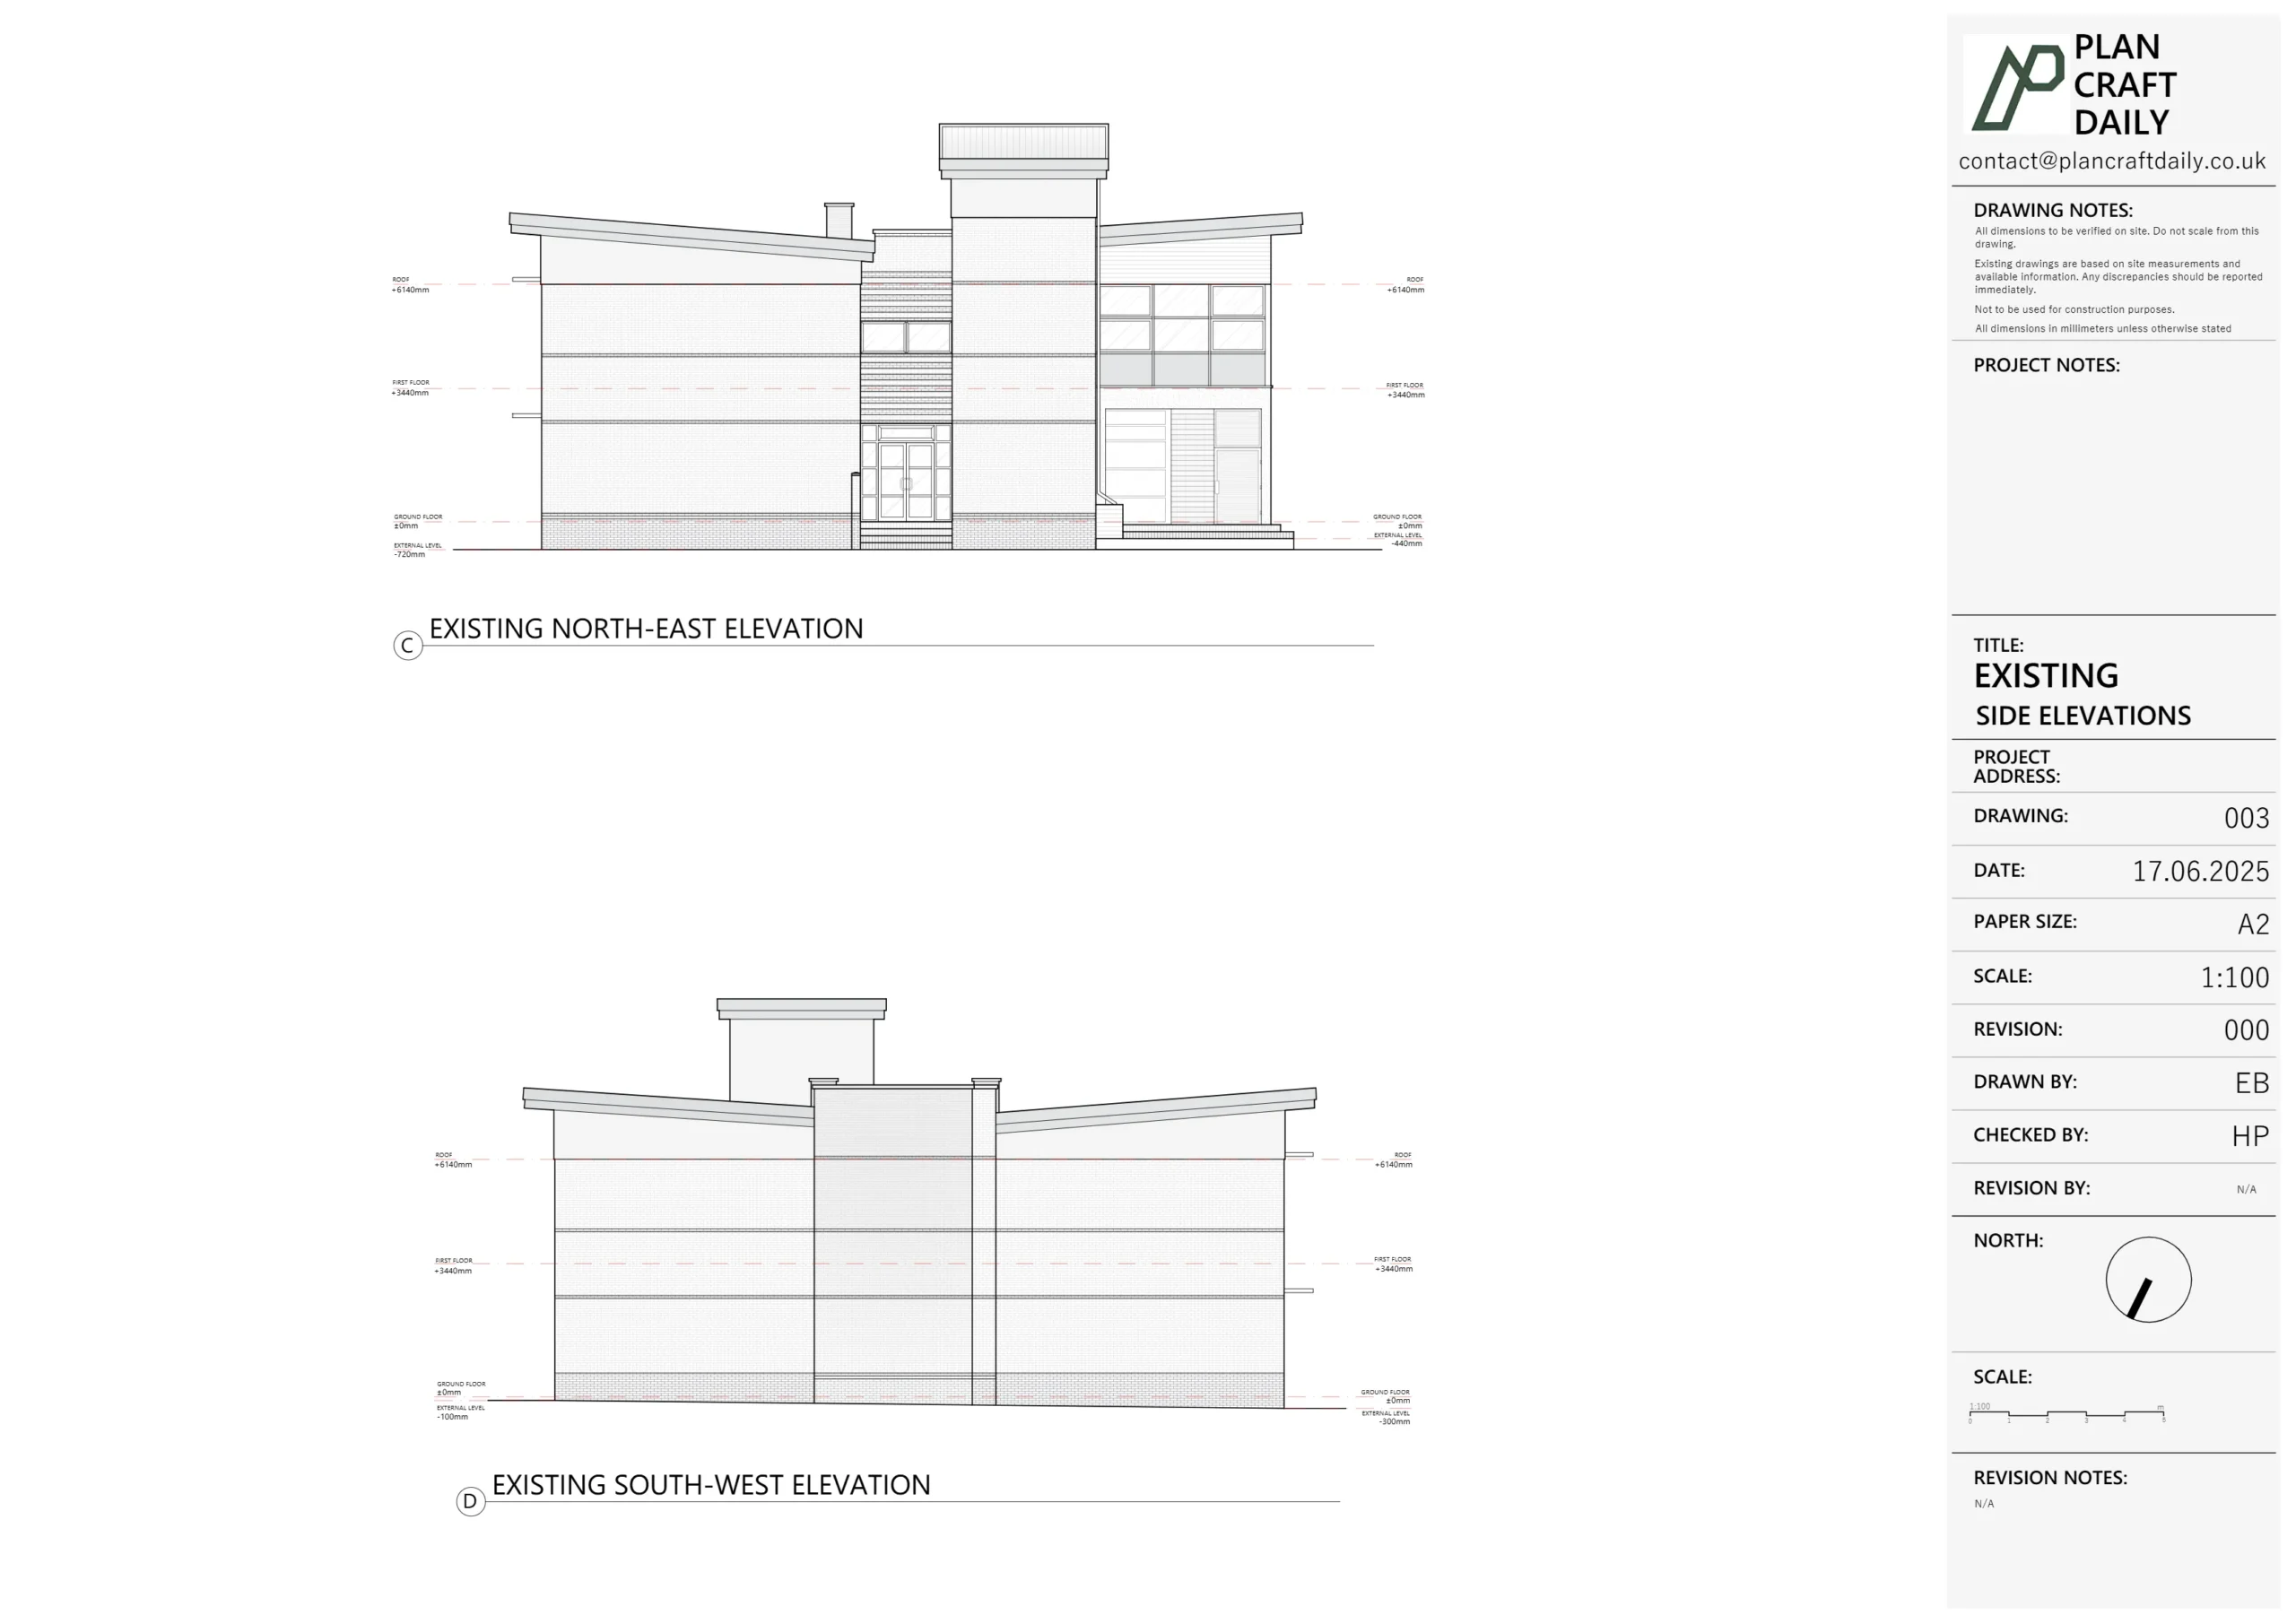
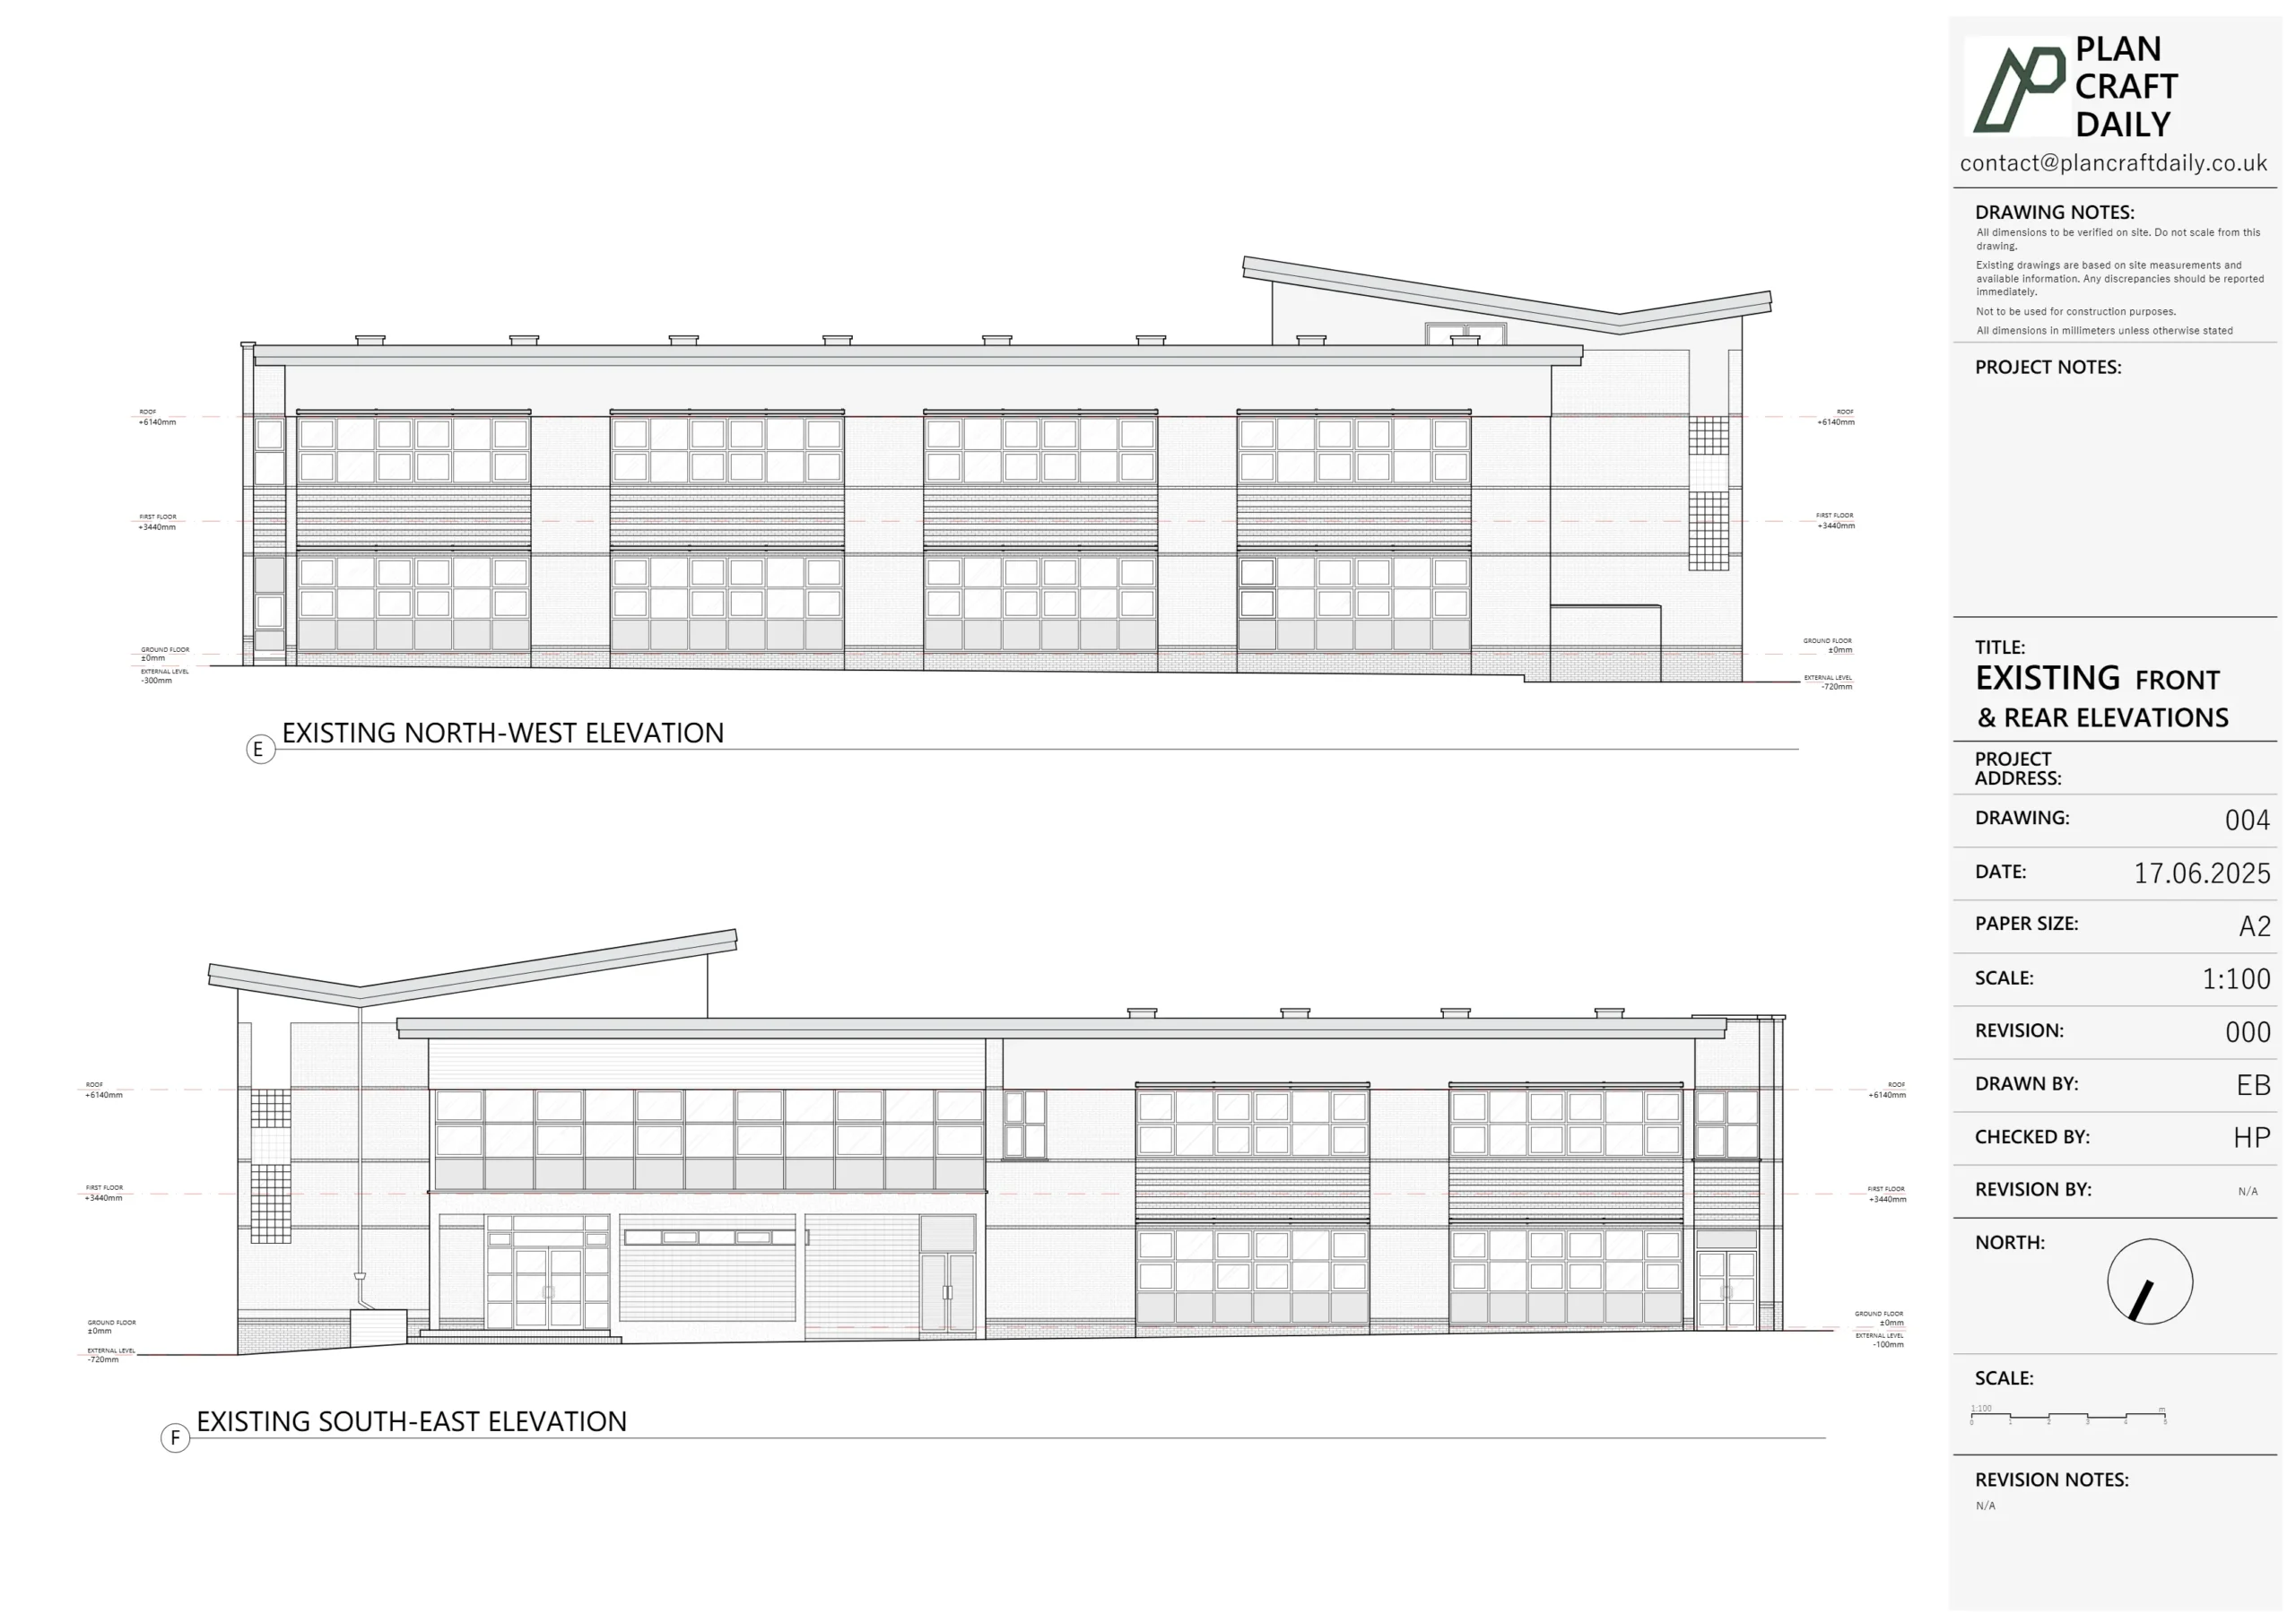
- Full measured survey of the existing house.
- Existing floor plans, roof plan, elevations and a section suitable for planning and design work.
- Drawings issued as PDFs and DWGs, with photos and a 3D scan link so their team could explore the property remotely.
Partway through the design process, the brief evolved. Shari’s team realised they needed:
- Level heights to be more clearly shown in the drawings.
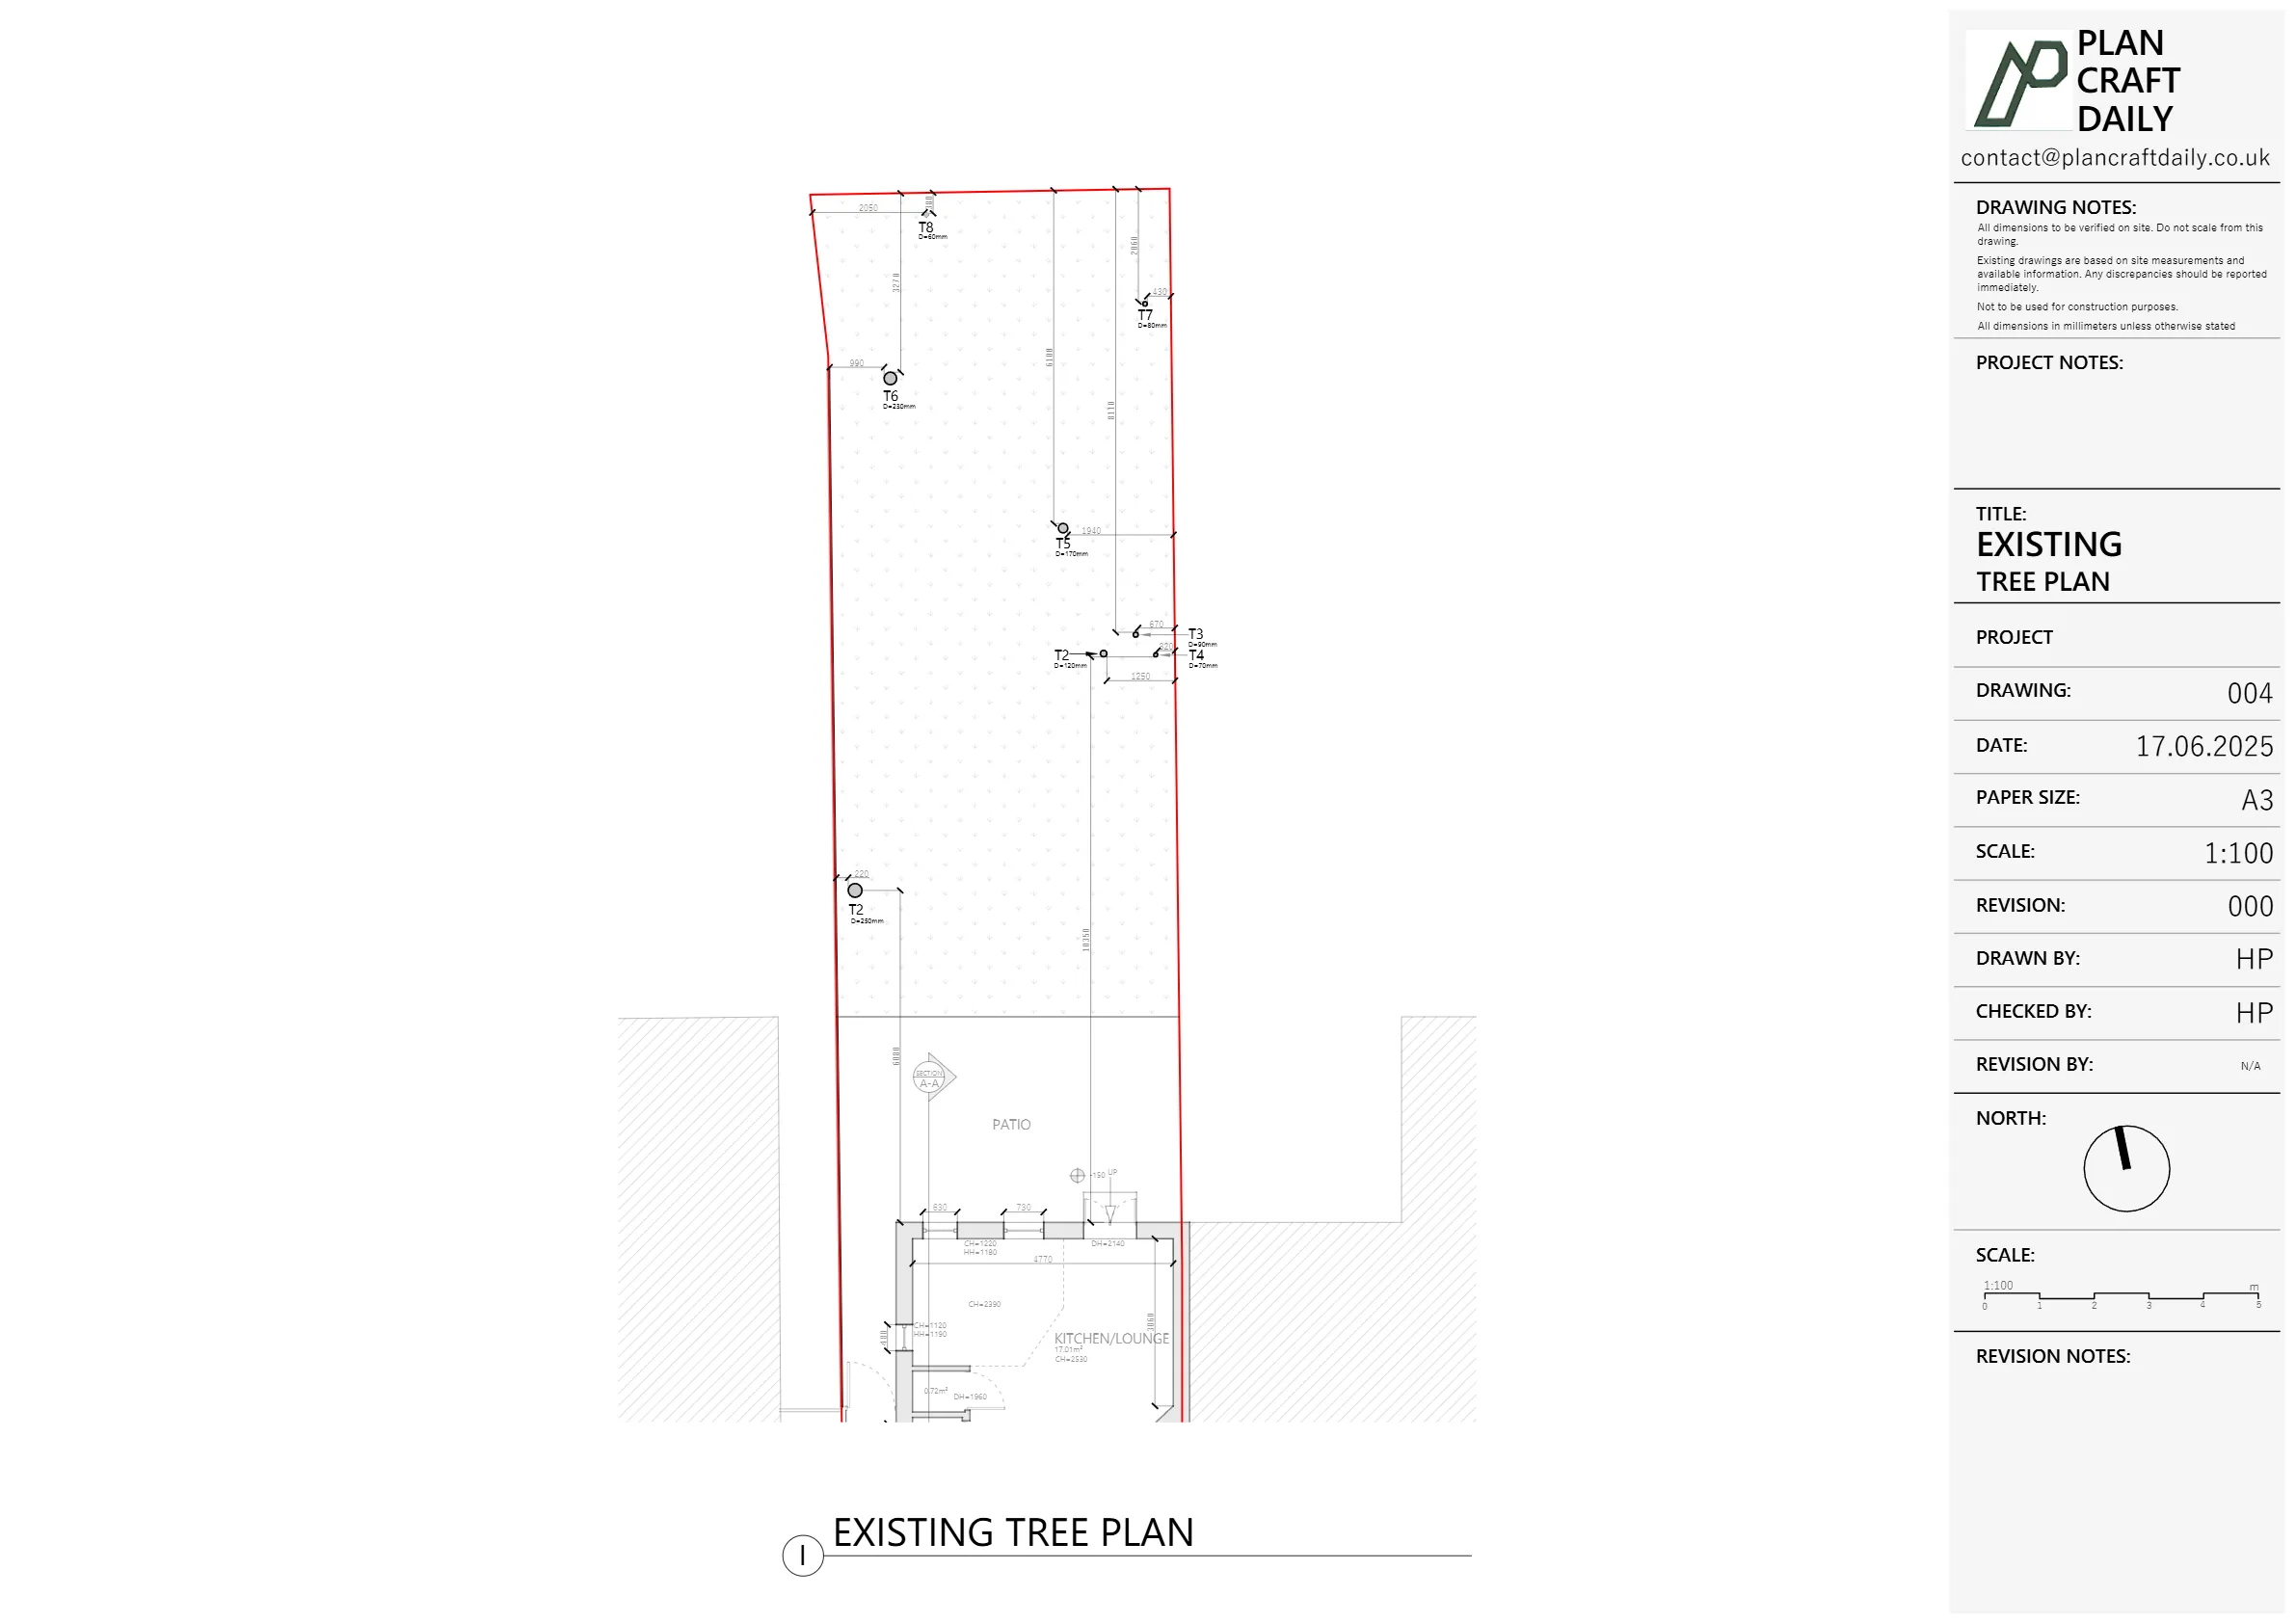
- Tree locations and trunk circumferences inside the garden, to inform design and any future discussion with planners and tree officers.
Rather than defaulting to a full topographical survey, Shari asked whether we could bolt on a tightly scoped, cost-effective tree survey to the original measured building work.
Booking the survey – coordination between client, architect and company
The instruction came initially via Shari and Vanessa (for billing), with a request to:
- Amend the invoice to Saloria Ltd,
- Confirm a specific survey window, and
- Provide surveyor contact details once the job was formally booked.
We proposed:
- Survey date: Thursday 22 May
- Arrival window: 12:30–1:30 pm (coordinated around another project on Kenton Road that morning)
Our standard process kicked in:
- We issued an invoice for the measured building survey and asked for the initial payment to secure the slot.
- Once payment was received, we sent:
- A payment receipt, and
- The surveyor’s name and mobile number (Mustafa, our senior surveyor), so Shari could pass details on to the client.
- Shari confirmed the client’s availability for the agreed window and we locked in the booking.
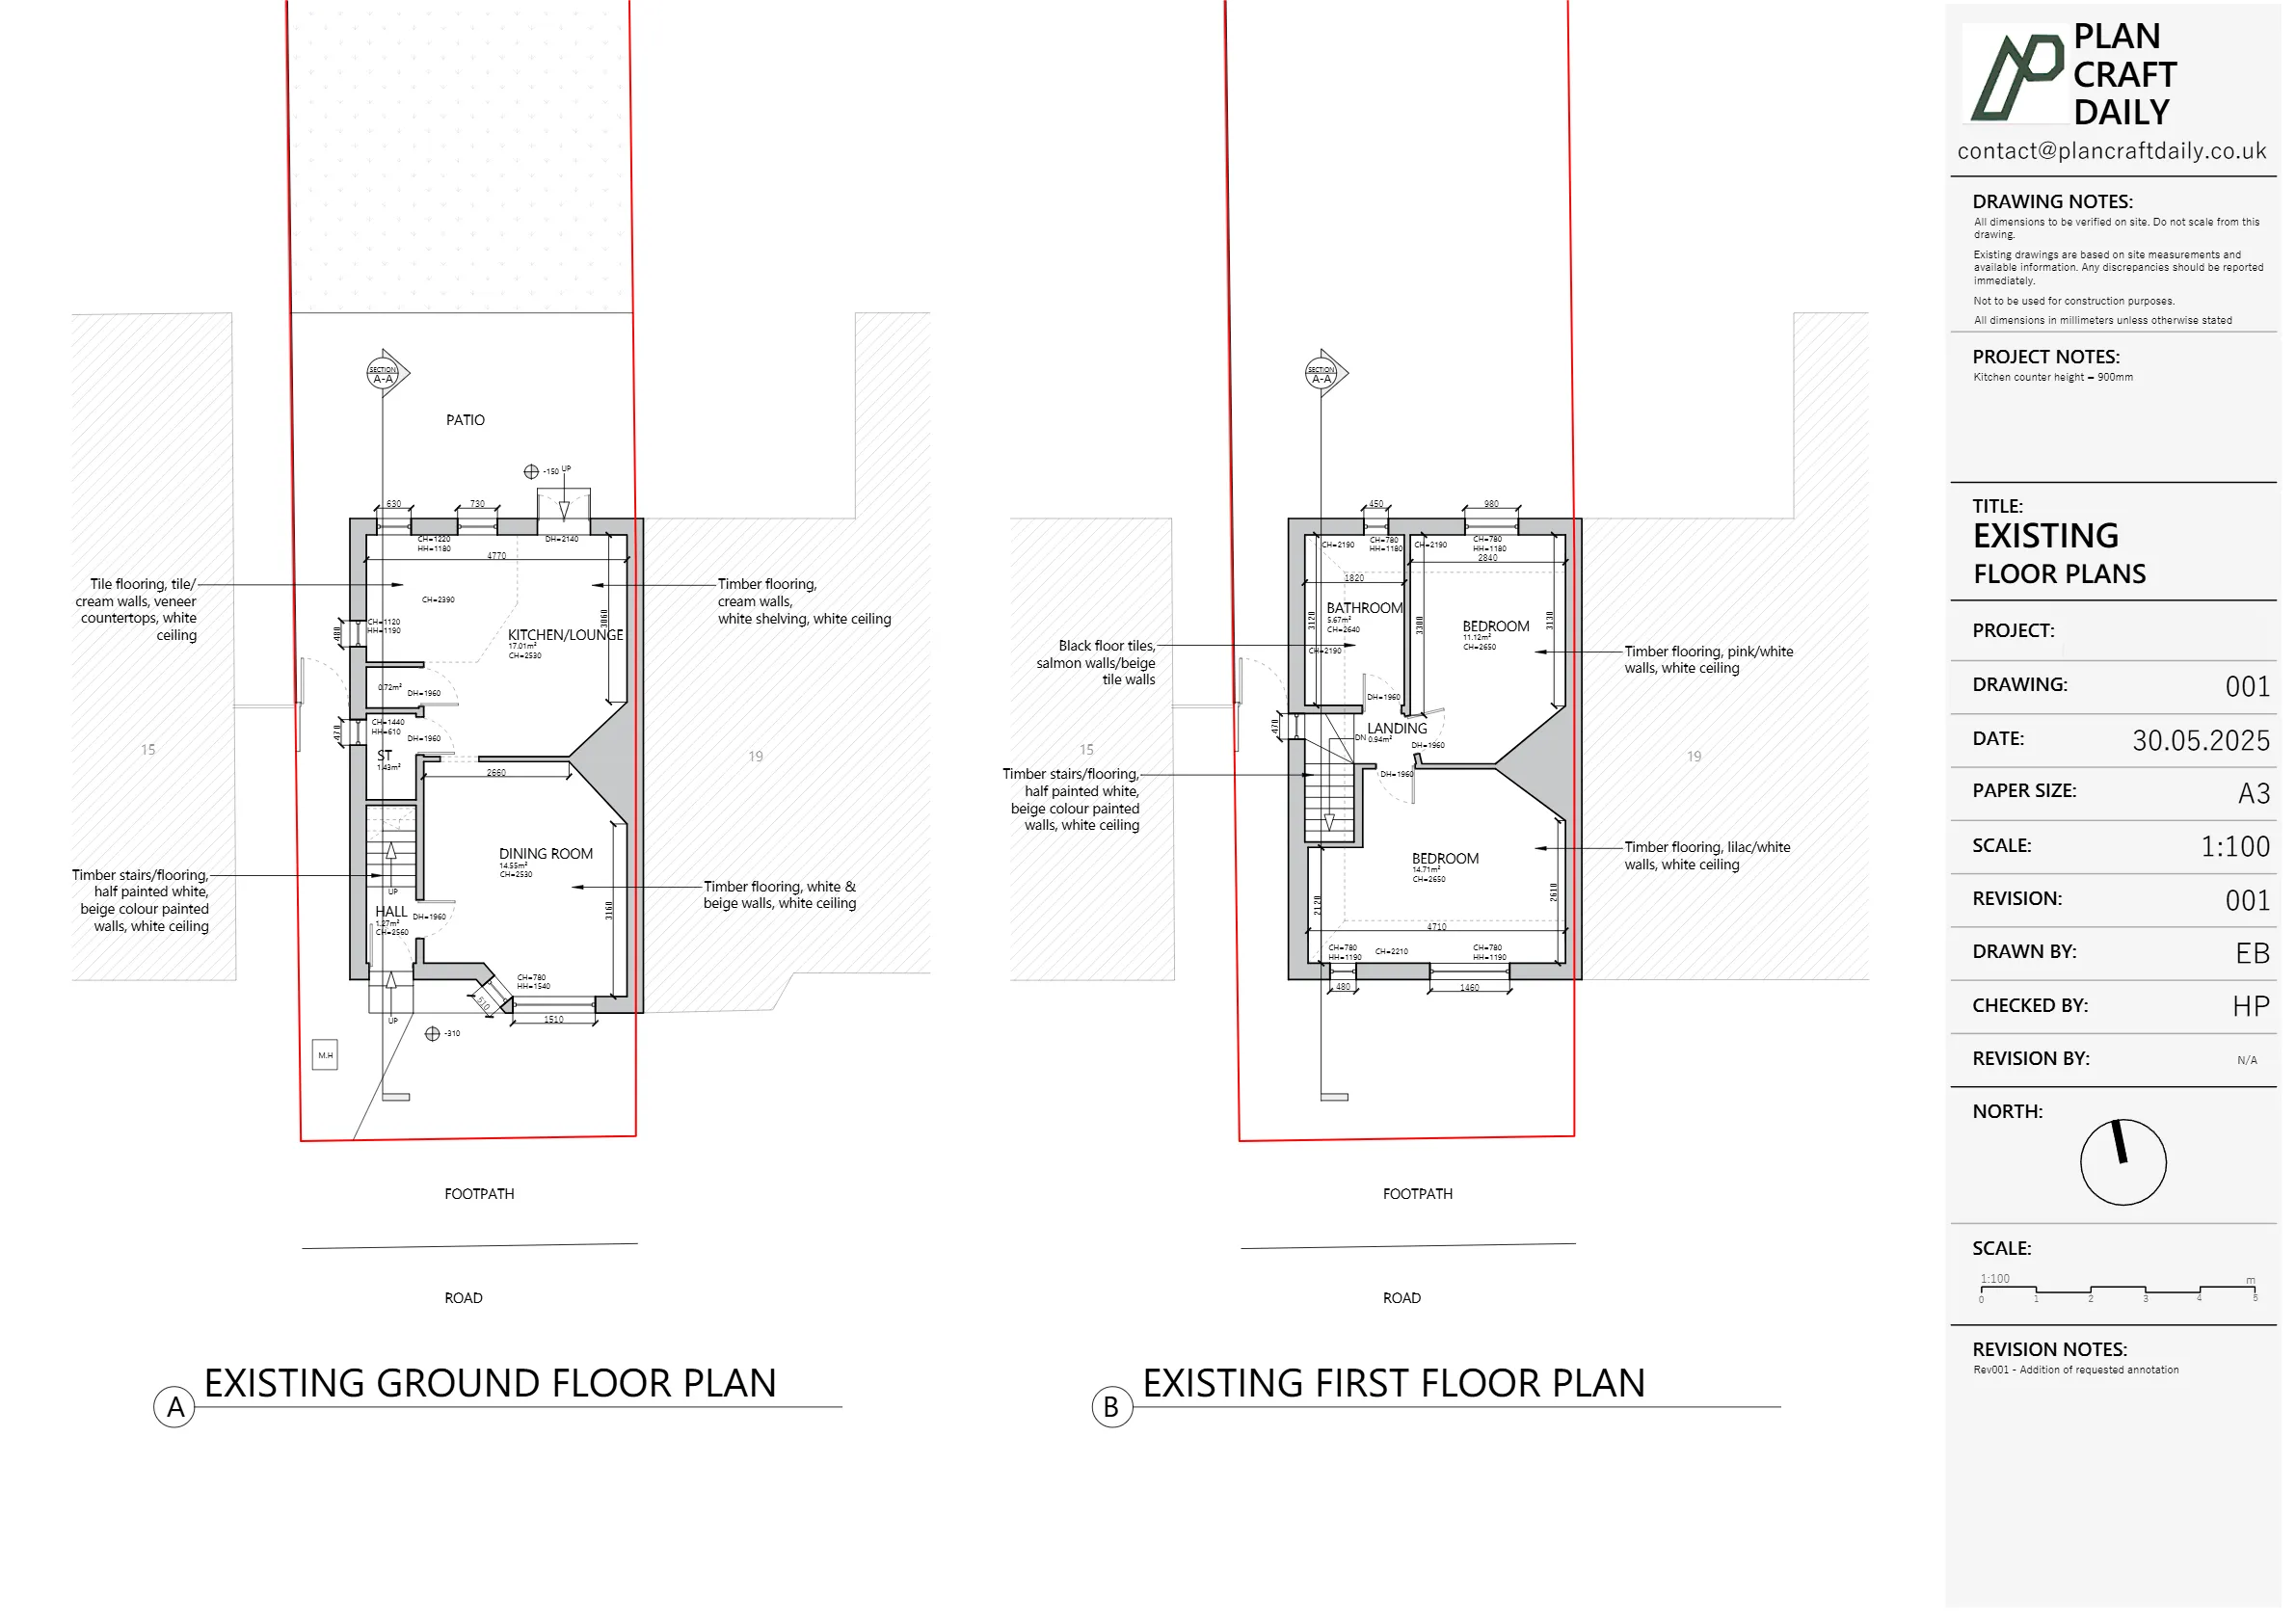
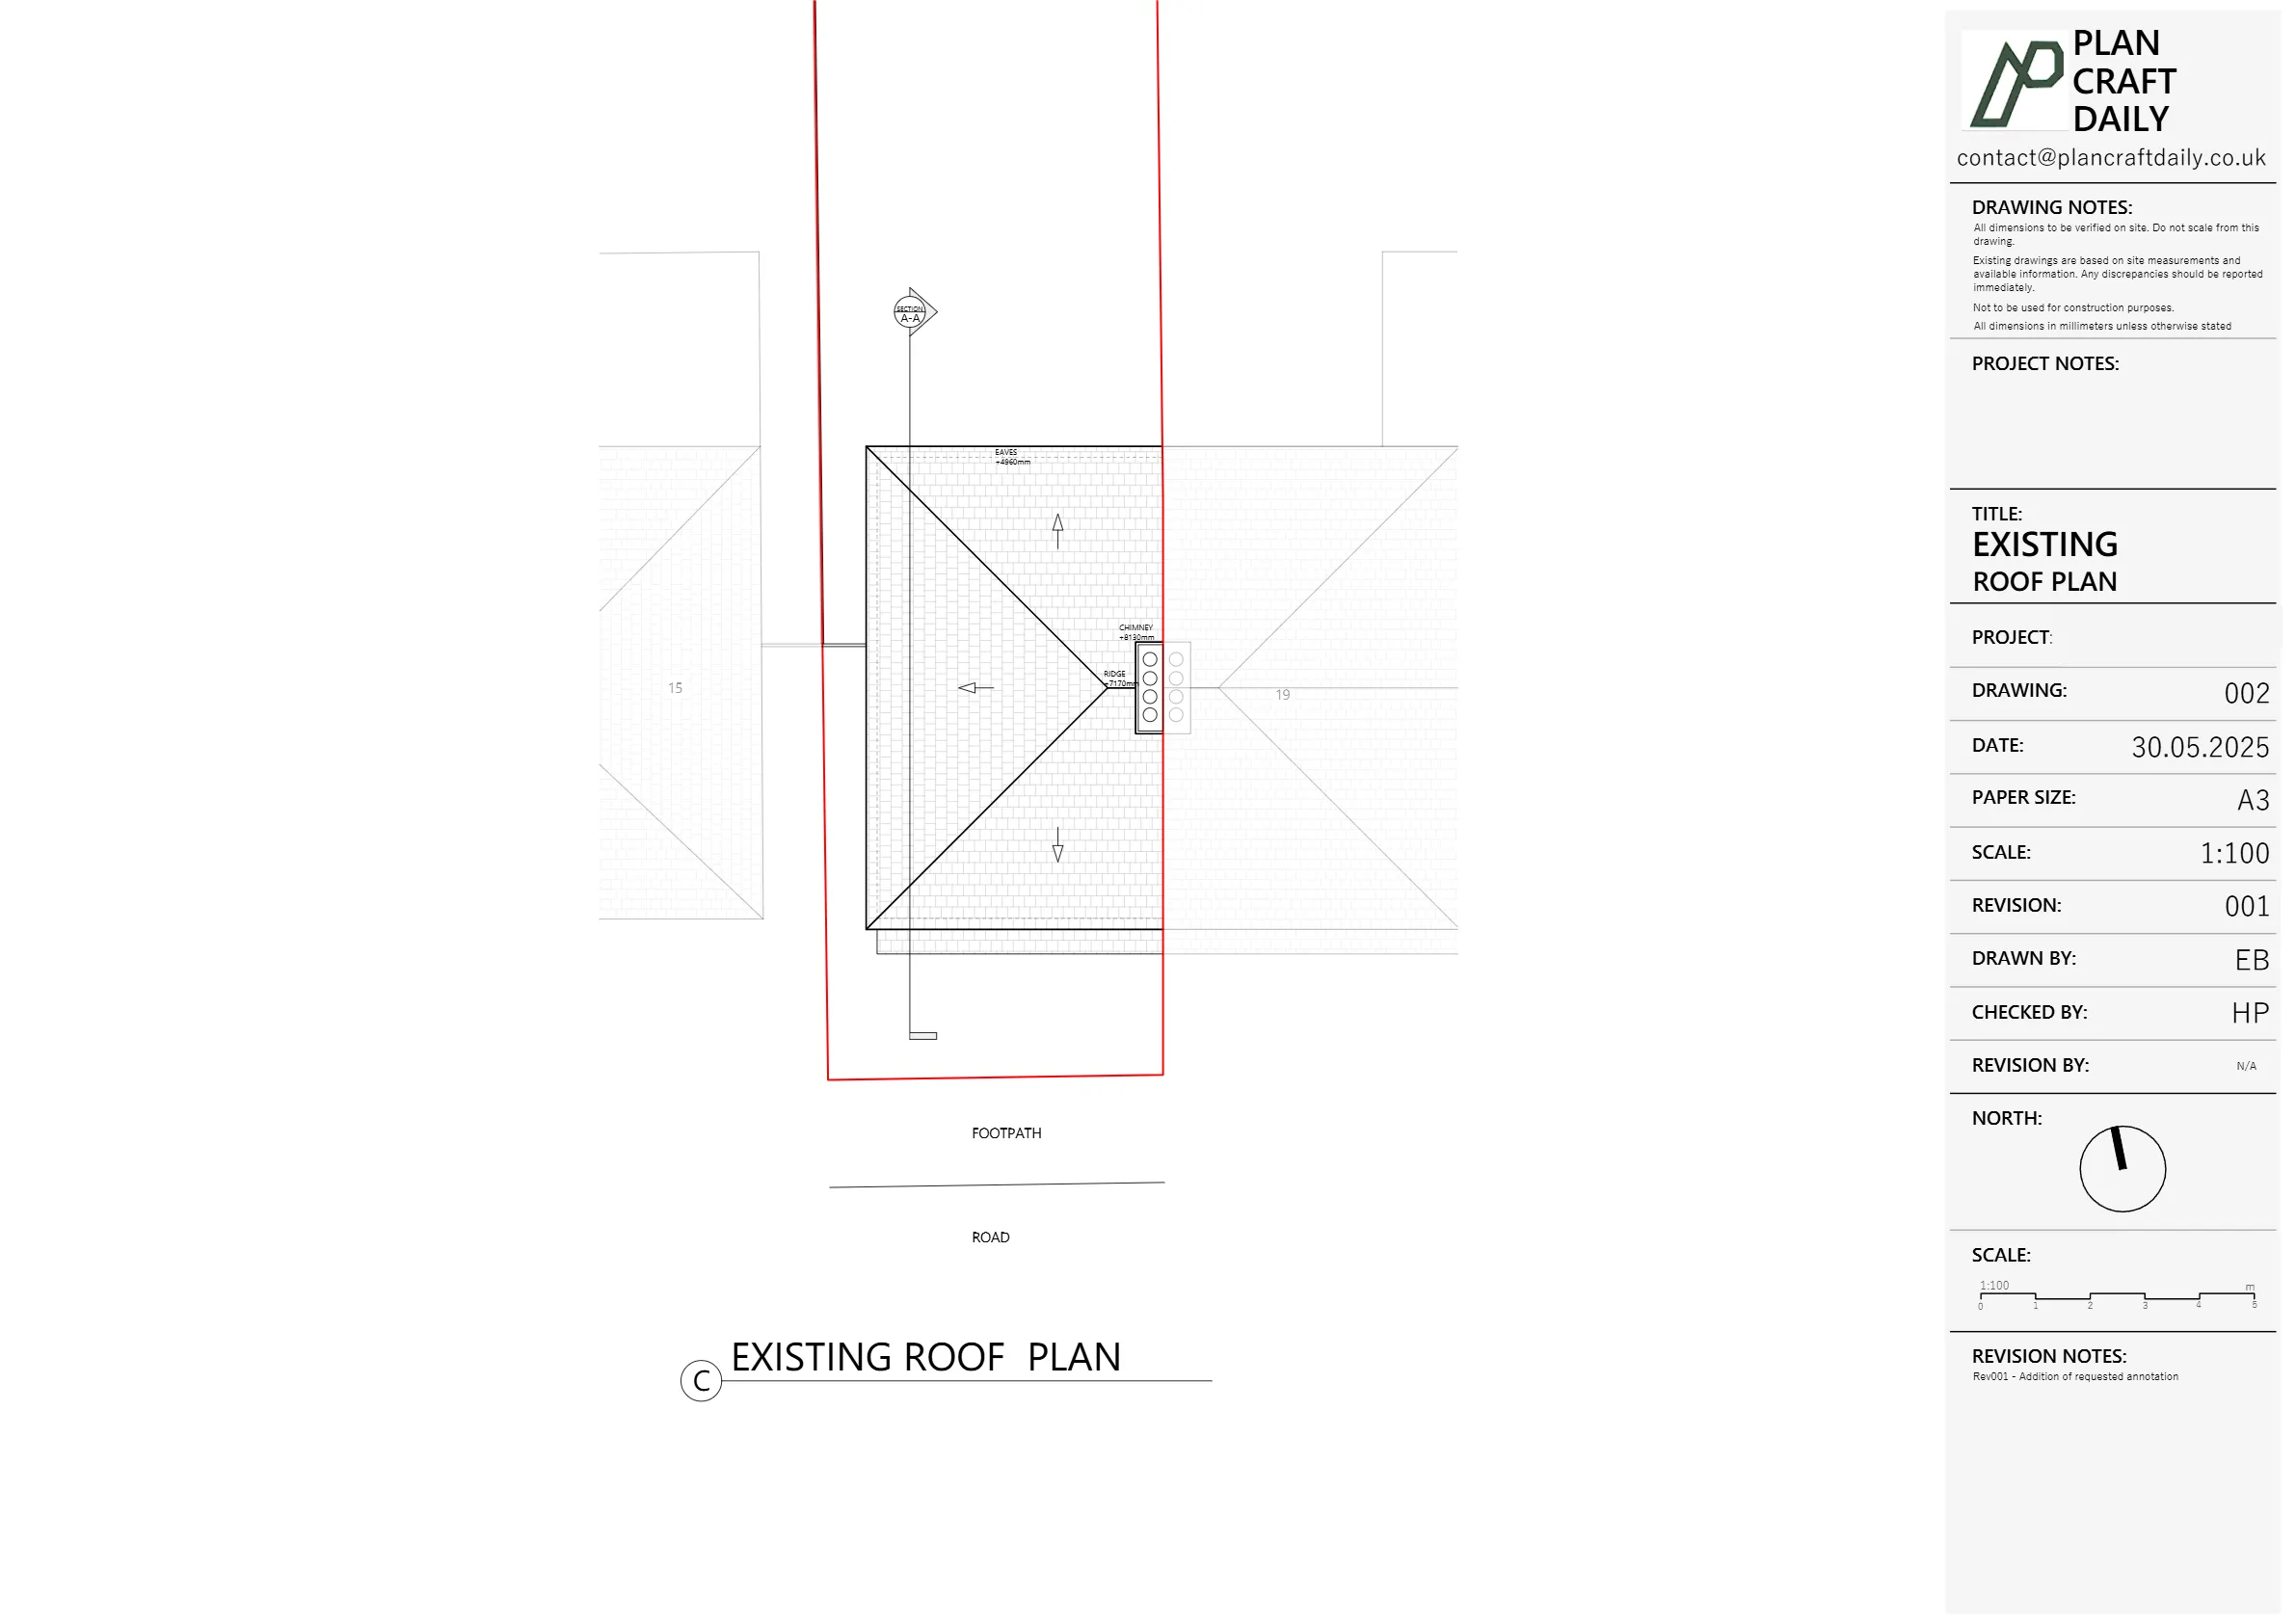
How we carried out the initial measured building survey
On the day of the survey, Mustafa attended within the agreed time window and followed our standard residential workflow:
- External envelope & context
- Measured the building footprint and key external dimensions.
- Recorded the relationship to boundaries and immediate site features visible from the property.
- Internal measured survey
- Used a laser distance meter to capture room sizes, wall thicknesses, door and window positions.
- Captured floor-to-ceiling heights, stair dimensions and other structural cues useful for design and future structural input.
- 3D scan & photographs
- Completed an internal 3D scan, giving us a rich point cloud to model from.
- Took a comprehensive photo set of internal spaces and external elevations so the architect could cross-check details later.
This first visit was scoped as a measured building survey, not a full topographical survey, so detailed ground levels and tree data were not part of the original brief.
Turning the survey into drawings – and running internal QA
Following the visit, our CAD team:
- Reconstructed the house in CAD from the 3D scan and control measurements.
- Produced draft floor plans, roof plan, elevations and a section.
- Set everything up on clean, layered DWG files with matching PDFs.
Before sending anything to the client, we ran the drawings through our internal QA phase:
- Checking geometry against the 3D scan.
- Ensuring dimensions, levels and annotations were consistent.
- Verifying that the drawing set matched the agreed deliverables.
Once QA was complete, we emailed Shari to say we were nearly finished, then issued:
- A draft PDF pack (Rev000), and
- A final invoice for the measured building work.
New requirements: levels and tree information
After reviewing the drafts, Shari came back with two key points:
- Levels
- She provided a marked-up file highlighting missing or unclear level heights that her team needed for their design work.
- We confirmed that, because there had been no topographical survey, levels would be approximate rather than engineering-grade, but we could still refine the drawings using the measurements we did have.
- Trees on the plot
- Shari asked whether we could indicate tree locations on the drawing.
- We explained that tree data hadn’t been captured on site as it was not part of the original scope and had not been mentioned at quoting stage.
- We advised that full accuracy on trees, ridge/eaves heights and broader site information normally requires a topographical survey and sits outside a standard measured building survey.
Shari acknowledged this, but their team still needed:
- Tree locations within the garden, and
- Circumference of tree trunks (not root protection extents or canopy spreads).
We checked the existing photos and clarified one point immediately: there was no bush directly in front of the property on site, and the apparent greenery in Google imagery was due to outdated Street View, not current conditions.
At this stage, we agreed to:
- Update the drawings with the requested levels as far as our measured data allowed.
- Propose a small follow-up visit focused solely on tree positions and circumferences.
Designing a targeted follow-up tree survey
We suggested a pragmatic approach:
- If we could combine the tree visit with another survey already in the same area, we could offer a much lower rate (around the cost of a short add-on).
- If a separate, dedicated visit was needed on a different day, there would be a slightly higher fee to cover extra travel and time—but still substantially less than a full topo survey.
We set out clearly that on the follow-up visit we would:
- Record tree positions relative to the building and boundaries.
- Measure trunk circumference at a standard height above ground (per Shari’s brief).
- Produce a dedicated CAD “Existing Tree Plan” and link relevant photos.
Shari then asked a key question:
“Can I confirm if these would be included in the CAD DWG?”
We confirmed yes – tree positions and circumferences would be added directly into the DWG, not just annotated on a PDF.
Once Shari had confirmed the client was happy with the adjusted fee, we:
- Issued an invoice for the second site visit.
- Confirmed an arrival window (around 1:00–1:30 pm) for the follow-up.
- Received payment and sent another payment receipt plus a reminder of the surveyor’s details.
Second visit – capturing the tree data
On the follow-up visit, Mustafa returned to the property with a tightly defined brief:
- Locate all relevant trees within the garden visible and accessible from the site.
- For each one, record:
- Position relative to fixed, measured features (corners of the house, fences, hardstanding, etc.).
- Trunk circumference at the agreed height.
- Supporting photographs to help the architects interpret the plan later.
Because this was a focused revisit, the time on site was shorter than a full survey but still treated with the same care:
- We avoided guessing from aerial imagery alone; everything was physically verified on site.
- The surveyor took additional context photos to ensure that the orientation and identity of each tree would be absolutely clear in CAD.
Back in the studio, we produced:
- 004_Existing_Tree Plan – a dedicated drawing showing:
- Tree symbols at measured positions.
- Trunk circumferences noted or scheduled.
- Clear relationship to house, boundaries and key features.
- A photo index tying tree labels to site photographs.
We then updated the shared folder link Shari already had, so she could access:
- The original existing building drawings (plans, roof, elevations, section).
- The 3D scan link.
- The new tree plan and associated photos.
Final outcome – a flexible, “layered” dataset for design
By the end of the process, Shari and Saloria Ltd had:
- A complete measured building survey with plans, roof plan, elevations and section.
- Clarified level information, suitable for early design and discussions (with the caveat that they weren’t topo-grade).
- A supplementary tree plan showing positions and circumferences, integrated directly into their DWG files.
- Ongoing access to a 3D scan and full photo pack for reference.
For this Kingston project, the main wins were:
- Shari’s team avoided commissioning a full topographical survey when they didn’t need the full scope—just targeted tree data layered on top of the measured building.
- Everyone kept a clear line between original scope and added scope, with transparent fees and written explanations at each step.
- The architect could start work early from the initial drawings while we refined levels and then returned for the tree survey, saving overall programme time.
For us, it’s a neat example of how we like to work with repeat professional clients:
- Honest about what is and isn’t included in a standard measured survey.
- Happy to design lightweight, add-on site visits when new requirements appear.
- Always backing up CAD with 3D scans and photos, so design teams can move confidently from survey through to planning and beyond.
Project Details
| Service Type | Measured Building Survey, Existing Drawings, 3D Scan + Follow-up Tree Location & Circumference Plan |
| Time Taken | Around 2–3 weeks |
| Location | Buckingham Road, Kingston upon Thames |